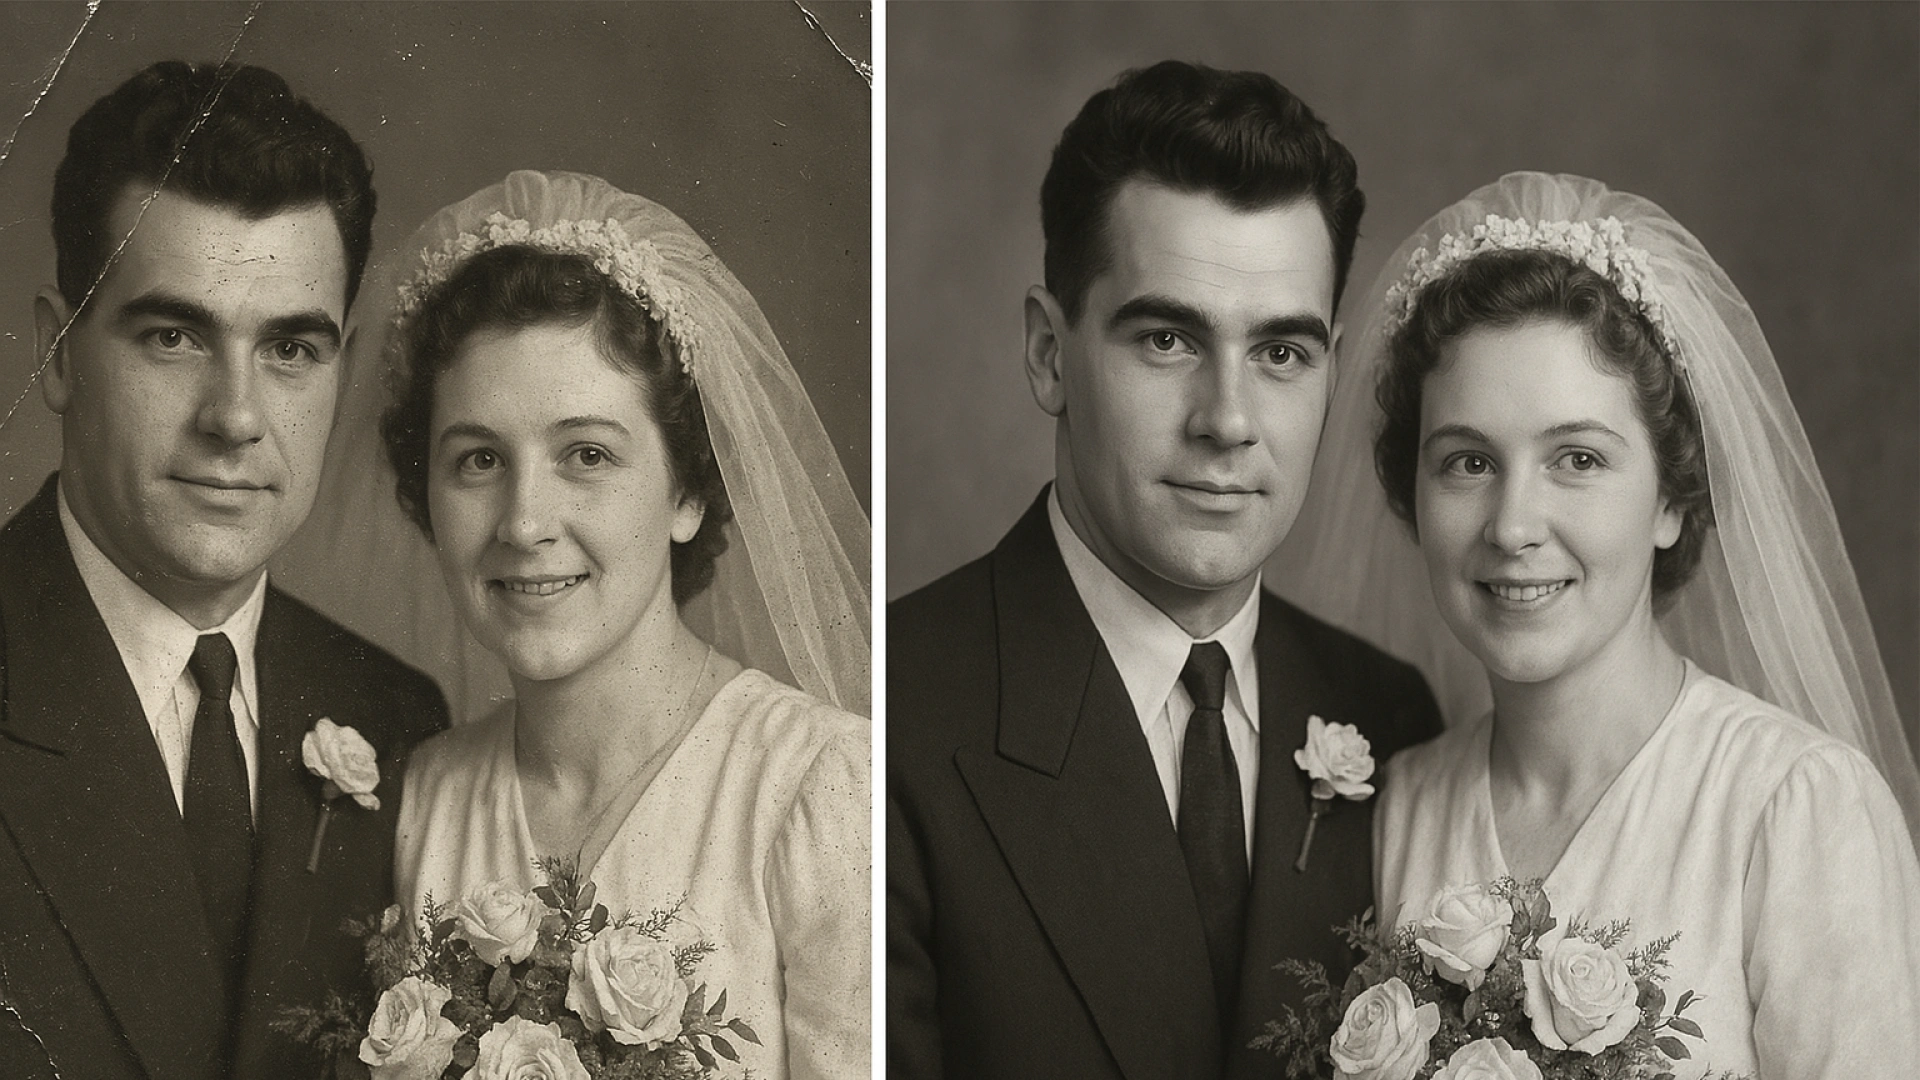
Restoring old photos black and white can be a deeply emotional and creatively rewarding experience. Whether you’re looking to preserve your family’s legacy or turn a forgotten photo into a gallery-worthy piece, the process can breathe new life into cherished memories. In this guide, we’ll walk through the steps, techniques, and tools that can help you create stunning, bold monochrome images using modern editing software.
Restoring Old Photos Black and White
Restoring old photos black and white isn’t just a technical process—it’s a heart-led mission. These are pieces of visual history, often holding the gaze of loved ones long gone, frozen in time. But as film ages, so does its charm—discoloring, scratching, and losing contrast. Fortunately, with just a few clicks and a dash of care, these treasured memories can shine once again.
Let’s face it—many old photos are far from perfect. That yellowish tint? That’s oxidation. The faded blacks? That’s time erasing emotion. But don’t worry—restoration is simpler than it looks, especially when you have the right digital tools. Whether you’re tech-savvy or a total beginner, this guide gives you everything you need to transform those faded moments into bold, clean, and classy monochrome masterpieces.

Scanning: The Foundation of Restoration
Everything begins with the scan. And while that might sound boring, it’s the most crucial step. If you scan poorly, even the best software can’t fully rescue the image. Use a flatbed scanner with at least 600 DPI for prints. For very small prints or details, crank it up to 1200 DPI. Never use a phone snapshot—it’s just not the same.
Place your image face-down, clean the scanner glass, and scan in TIFF format for the highest quality. JPEGs are fine too, but TIFFs give you more flexibility during editing. Save your scan with a descriptive filename—you’ll thank yourself later!
Stripping the Yellow: Converting to Black and White
Ah yes, the classic yellow haze. It adds charm—until it doesn’t. The quickest way to eliminate this is by converting your photo to black and white right off the bat. This helps “neutralize” the photo and clears the deck for enhancement. In Luminar Neo, use the Black & White Tool and reduce the Luminance value of yellows to -100. Boom—color gone, clarity born.
Even if your photo doesn’t scream “colorful”, you’ll be amazed how much a touch of color degradation affects its look. Removing this clears the fog of time.

Enriching Black Tones and Contrast
Once you’re in black and white mode, it’s time to make your photo pop. Use the Develop Tool in Luminar and bring down the Highlights just a tad. Then, push the Blacks deeper for mood, and gently nudge the Whites to add sparkle. Don’t forget to tweak Smart Contrast—it boosts depth without going overboard.
Pro tip: Don’t crank contrast too high—it can ruin subtle shadow detail.

Reducing Shadows, Increasing Soul
You’d be surprised how many old photos have rich details hidden in the shadows. Tap into those treasures by increasing the Shadows slider slightly. This reveals facial features, textures, and fabric details that were previously invisible.
Now your image isn’t just black and white—it’s bold and storytelling.
The Noise Battle: Quieting the Grain
Scanned photos often come with some serious grain, especially if they were printed on textured paper. Use Luminar Neo’s Noiseless AI to target and remove that fuzz without smudging details. Set it to “Middle” strength for a safe clean-up. A side-by-side comparison will show how much cleaner and professional your photo looks afterward.
The Final Polish: Sharpness and Detail
Should you use the Structure tool or the Details tool? Structure works well for landscapes or objects, but for portraits, Details is your friend. Apply it softly—just a touch on Small Details and a whisper on Medium. Too much sharpening can make skin look crunchy.

Add Some Mood—Or Not
You can use the Mood Tool in Luminar to apply LUTs for that cinematic flair. Want a vintage vibe? Choose a soft sepia LUT and dial it way down. For something bolder, try a contrasty monochrome LUT. Just don’t overdo it—subtlety sells.

Print Like a Pro: Why Paper Matters
Ever tried metallic paper? It gives black-and-white images a luxurious, almost wet look. Deep blacks, crisp whites, and rich silvers—it turns your restored photo into a showstopper. Whether framed or gifted, these prints spark awe and admiration.
Frequently Asked Questions
Yes! Luminar Neo and similar tools are beginner-friendly with one-click enhancements and tutorials.
TIFF is best for editing. JPEG is okay if you’re short on space or only doing minor edits.
You need to adjust shadows, highlights, and contrast after conversion. That’s where the magic happens.
Only if they enhance, not distract. Subtlety is key—try soft cinematic LUTs.
Smart Contrast adjusts dynamically based on image content, preserving midtones better.
Look for professional labs that offer metallic or archival paper options like Mpix or Bay Photo.
Conclusion
Restoring old photos black and white is more than a digital makeover—it’s a revival of history, soul, and story. With just a few thoughtful steps, anyone can take a faded memory and turn it into something timeless. The blend of technology and emotion is what makes this art form so uniquely human.
So go ahead—grab those dusty albums, fire up your scanner, and bring your history back to life.