Introduction to Colorizing Black and White Photos
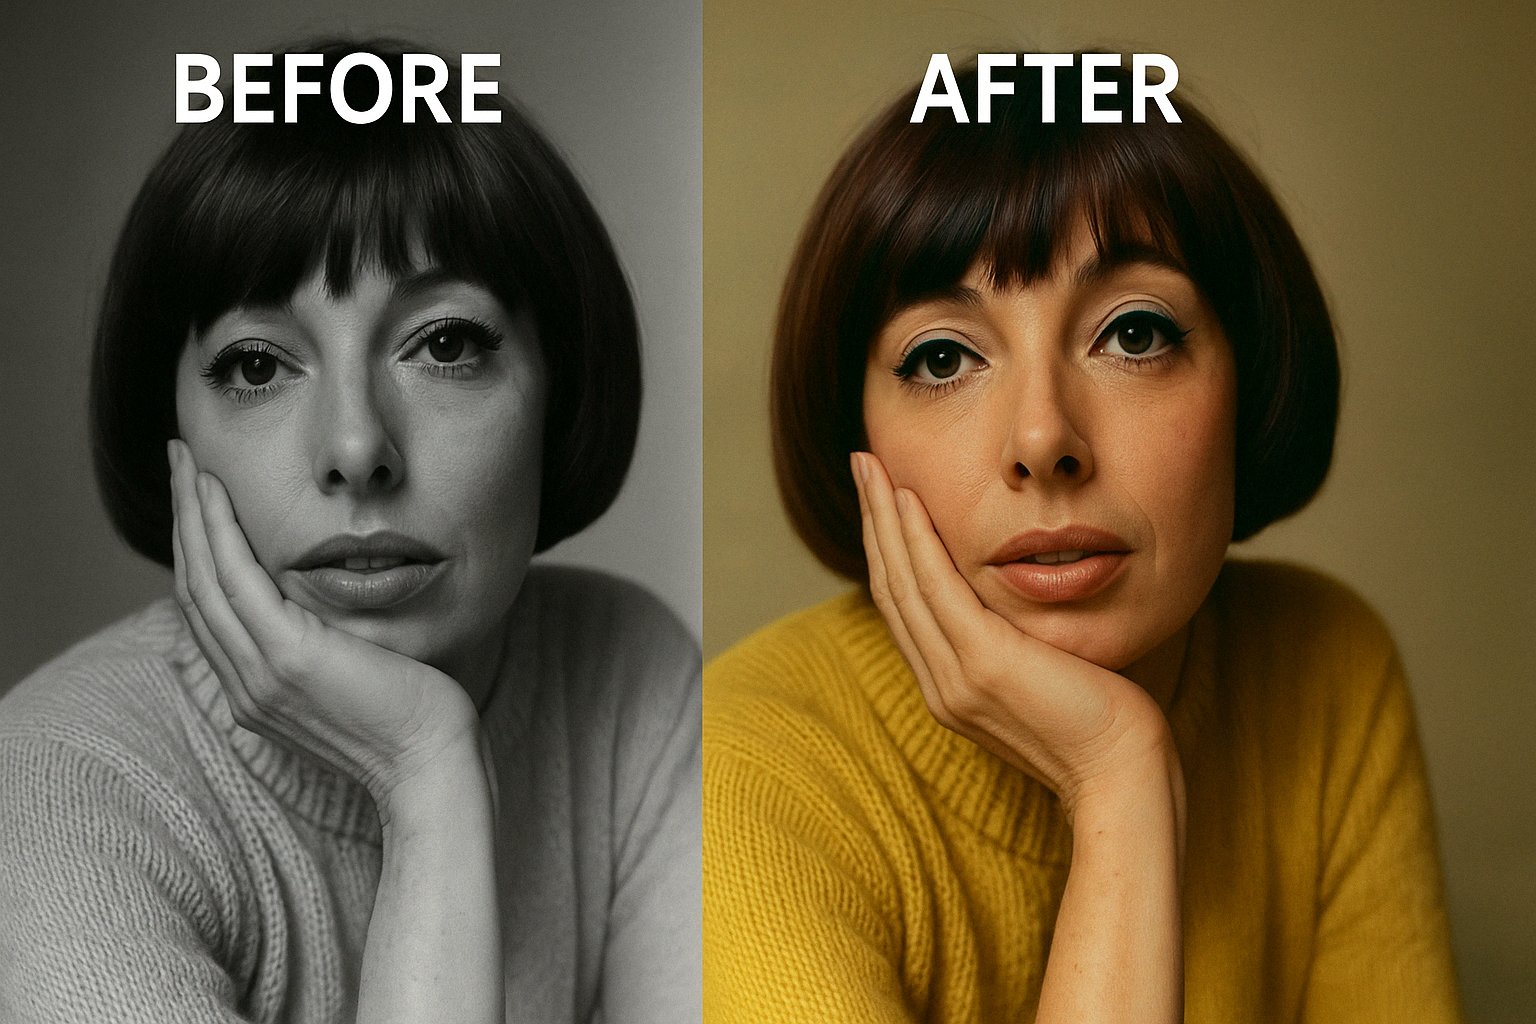
Black and white photos carry a charm of their own. They evoke nostalgia, mystery, and a timeless feel. However, there’s undeniable magic in bringing these moments into full color, making the past feel vivid and alive again. In this colorize black and white photos tutorial, you’ll discover the simplest, most effective way to breathe new life into your treasured memories.
What You Need Before Starting
Before diving in, gather your essentials: Luminar Neo installed on your computer, a steady internet connection, and a sample black and white image. An open mind and a bit of patience will also come in handy!
Setting Expectations: What Can Be Achieved
While modern AI tools are incredibly powerful, remember that automatic colorization isn’t perfect. Some manual fine-tuning is always recommended to make your photos pop authentically.
Why Choose Luminar Neo for Photo Editing
Luminar Neo is famed for its AI-powered editing capabilities. It’s user-friendly, fast, and allows in-depth control over every element of your image. Plus, you don’t need to be a professional to create stunning edits!
Using Online AI Tools to Kickstart Colorization
To accelerate the initial phase, we’ll use an online platform: Palette.fm. This AI-driven tool scans your black and white photo and suggests realistic colorizations instantly.
Step 1: Preparing Your Workspace
Organize your working files neatly. Create folders for the original image, colorized variations, and final edits. Keeping things structured saves massive headaches later.
Step 2: Uploading Your Image to Palette.fm
Open your internet browser, visit Palette.fm, and upload your black and white photo. Within seconds, the AI will generate a colorful version for you.

Step 3: Understanding the Base Palette
The “base palette” is Palette.fm’s first guess at realistic colors. It gives a strong foundation but isn’t final—think of it as a rough sketch.
Step 4: Choosing the Best Preset for Your Image
Experiment with presets like “Lavender Desk,” “Cinematic Shades,” or “Faded Elegance.” Each preset offers a slightly different mood, from warm nostalgia to crisp vibrancy.

Step 5: Downloading Your Colorized Variations
Once you’re happy with your choices, download the standard resolution images. No need to pay for HD versions—lower resolutions are sufficient for our purpose!
Step 6: Importing into Luminar Neo
Load your original photo and colorized variations into Luminar Neo. Use the “Load Image” option in the Layers panel.

Step 7: Blending Layers for Natural Effects
Stack the layers, and set their blend mode to “Color.” This allows you to steal only the color information, without ruining the fine details of the original photo.
Step 8: Focusing on Skin Tones
Choose the variation with the most natural skin tones. Apply it selectively using masks to ensure a lifelike complexion.

Step 9: Bringing Out Clothing Colors
If you prefer a different palette for clothing (say, a vibrant yellow jumper), you can use another layer focused only on apparel.

Step 10: Mastering Layer Masks
Use Mask AI or manual brushing to selectively apply your color layers. Precision here really makes or breaks the final image.
Step 11: Fixing Small Imperfections
Use the Erase or Clone tools to fix minor glitches—like odd color patches on teeth or stray smudges in the background.
Step 12: Exporting for Further Edits
Once happy, export the file at maximum quality settings (300 dpi, TIFF format recommended).
Step 13: Enhancing with Luminar Neo’s Tools
Import the exported image back into Luminar Neo for the final creative polish. Face AI, Skin AI, and Supercontrast tools are your best friends here.
Step 14: Adjusting Eyes and Teeth for Realism
Whiten the teeth, sharpen the irises, and even adjust eye color slightly for an irresistible, lifelike stare.
Step 15: Balancing Light and Contrast
Fine-tune brightness, midtones, and shadows. Supercontrast adds that magazine-quality finish.

Step 16: Adding a Finishing Vignette
A subtle vignette draws viewers’ attention straight to the subject’s face and gives a classic look.

Step 17: Saving Your Masterpiece
Save the final image in high-quality JPEG and TIFF formats. Also, consider keeping a PSD file if future adjustments are needed.
Common Mistakes to Avoid When Colorizing
- Over-saturating colors
- Ignoring skin tone nuances
- Forgetting to use layer masks
- Not refining exported images
- Trusting AI colorization blindly
Benefits of Colorizing Old Photos
Colorizing photos not only brings them to life but also offers a profound emotional connection to the past. It’s a gift to future generations and a celebration of memories.
Alternative Tools You Could Explore
If you want to explore beyond Palette.fm and Luminar Neo, check out DeOldify, Photoshop’s Colorize Neural Filter, and MyHeritage’s Photo Enhancer.
How Clever Photographer Membership Can Help
Joining Clever Photographer Plus gives you monthly bundles of overlays, LUTs, backgrounds, textures, and more—all ready to boost your creative projects even further.
Conclusion: Your New Skills in Action
Congratulations! You’ve now unlocked the exciting world of photo colorization. Practice a few more times, play with different palettes, and soon you’ll be transforming black and white photos like a pro.
FAQs
Palette.fm and DeOldify are excellent free starting points.
Not absolutely necessary, but it vastly improves control and final output.
About 30 minutes to an hour, depending on your perfectionism level.
Absolutely! Just pay more attention to consistent skin tones.
Blend multiple presets manually in Luminar Neo for the best results.
Not directly—colorizing video frames requires different software and approaches.